DAY 11 -AZURE DP900(Microsoft Azure Data Fundamentals: Explore relational data in Azure,-- Explore provisioning and deploying relational database services in Azure--Query relational data in Azure)
Describe configuring relational data services
After you've provisioned a resource, you'll often need to configure it to meet the needs of your applications and environment. For example, you might need to set up network access, or open a firewall port to enable your applications to connect to the resource.
In this unit, you'll learn how to enable network access to your resources, and how you can prevent accidental exposure of your resources to third parties. You'll see how to use authentication and access control to protect the data managed by your resources.
Configure connectivity and firewalls
The default connectivity for Azure relational data services is to disable access to the world.
Configure connectivity to virtual networks and on-premises computers
To enable connectivity, use the Firewalls and virtual networks page for a service. To enable connectivity, choose Selected networks. Three further sections will appear, labeled Virtual network, Firewall, and Exceptions.
Note
An Azure Virtual Network is a representation of your own network in the cloud. A virtual network enables you to connect virtual machines and Azure services together, in much the same way that you might use a physical network on-premises. Azure ensures that each virtual network is isolated from other virtual networks created by other users, and from the Internet. Azure enables you to specify which machines (real and virtual), and services, are allowed to access resources on the virtual network, and which ports they can use.
In the Virtual networks section, you can specify which virtual networks are allowed to route traffic to the service. When you create items such as web applications and virtual machines, you can add them to a virtual network. If these applications and virtual machines require access to your resource, add the virtual network containing these items to the list of allowed networks.
If you need to connect to the service from an on-premises computer, in the Firewall section, add the IP address of the computer. This setting creates a firewall rule that allows traffic from that address to reach the service.
The Exceptions setting allows you to enable access to any other services that cannot be uniquely isolated through virtual network or IP address rules.
The image below shows the Firewalls and virtual networks page for an Azure SQL database. MySQL and PostgreSQL have a similar page.

Note
Azure SQL Database communicates over port 1433. If you're trying to connect from within a corporate network, outbound traffic over port 1433 might not be allowed by your network's firewall. If so, you can't connect to your Azure SQL Database server unless your IT department opens port 1433.
Important
A firewall rule of 0.0.0.0 enables all Azure services to pass through the server-level firewall rule and attempt to connect to a single or pooled database through the server.
Configure connectivity from private endpoints.
Azure Private Endpoint is a network interface that connects you privately and securely to a service powered by Azure Private Link. Private Endpoint uses a private IP address from your virtual network, effectively bringing the service into your virtual network. The service could be an Azure service such as Azure App Service, or your own Private Link Service. For detailed information, read What is Azure Private Endpoint?.
The Private endpoint connections page for a service allows you to specify which private endpoints, if any, are permitted access to your service. You can use the settings on this page, together with the Firewalls and virtual networks page, to completely lock down users and applications from accessing public endpoints to connect to your Azure SQL Database account.
Configure authentication
With Azure Active Directory (AD) authentication, you can centrally manage the identities of database users and other Microsoft services in one central location. Central ID management provides a single place to manage database users and simplifies permission management.
You can use these identities and configure access to your relational data services.
For detailed information on using Azure AD with Azure SQL database, visit the page What is Azure Active Directory authentication for SQL database on the Microsoft website. You can also authenticate users connecting to Azure Database for PostgreSQL and Azure Database for MySQL with AD.
Configure access control
Azure AD enables you to specify who, or what, can access your resources. Access control defines what a user or application can do with your resources once they've been authenticated.
Access management for cloud resources is a critical function for any organization that is using the cloud. Azure role-based access control (Azure RBAC) helps you manage who has access to Azure resources, and what they can do with those resources. For example, using RBAC you could:
- Allow one user to manage virtual machines in a subscription and another user to manage virtual networks.
- Allow a database administrator group to manage SQL databases in a subscription.
- Allow a user to manage all resources in a resource group, such as virtual machines, websites, and subnets.
- Allow an application to access all resources in a resource group.
You control access to resources using Azure RBAC to create role assignments. A role assignment consists of three elements: a security principal, a role definition, and a scope.
A security principal is an object that represents a user, group, service principal, or managed identity that is requesting access to Azure resources.
A role definition, often abbreviated to role, is a collection of permissions. A role definition lists the operations that can be performed, such as read, write, and delete. Roles can be given high-level names, like owner, or specific names, like virtual machine reader. Azure includes several built-in roles that you can use, including:
Owner - Has full access to all resources including the right to delegate access to others.
Contributor - Can create and manage all types of Azure resources but can't grant access to others.
Reader- Can view existing Azure resources.
User Access Administrator - Lets you manage user access to Azure resources.
You can also create your own custom roles. For detailed information, see Create or update Azure custom roles using the Azure portal on the Microsoft website.
A scope lists the set of resources that the access applies to. When you assign a role, you can further limit the actions allowed by defining a scope. This is helpful if, for example, you want to make someone a Website Contributor, but only for one resource group.
You add role assignments to a resource in the Azure portal using the Access control (IAM) page. The Role assignments tab enables you to associate a role with a security principal, defining the level of access the role has to the resource. For further information, read Add or remove Azure role assignments using the Azure portal.

Configure advanced data security
Apart from authentication and authorization, many services provide additional protection through advanced data security.
Advanced data security implements threat protection and assessment. Threat protection adds security intelligence to your service. This intelligence monitors the service and detects unusual patterns of activity that could be harmful, or compromise the data managed by the service. Assessment identifies potential security vulnerabilities and recommends actions to mitigate them.
The image below shows the Advanced data security page for SQL database. The corresponding pages for MySQL and PostgreSQL are similar.

Describe configuring Azure SQL Database, Azure Database for PostgreSQL, and Azure Database for MySQL
This unit explores the specific configuration options available to each type of data store within Azure relational data services.
Configure Azure SQL Database
The overarching principle for network security of the Azure SQL Database offering is to allow only the connection and communication that is necessary to allow the service to operate. All other ports, protocols, and connections are blocked by default. Virtual local area networks (VLANs) and access control lists (ACLs) are used to restrict network communications by source and destination networks, protocols, and port numbers.
Note
An ACL contains a list of resources, and the objects (users, computers, and applications) that are allowed to access those resources. When an object attempts to use a resource that is protected by an ACL, if it's not in the list, it won't be given access.
Items that implement network-based ACLs include routers and load balancers. You control traffic flow through these items by defining firewall rules.
The following steps describe how a connection is established to an Azure SQL database:
Clients connect to a gateway that has a public IP address and listens on port 1433.
Depending on the effective connection policy, the gateway either redirects traffic to the database cluster, or acts as a proxy for the database cluster.
Note
Azure SQL Database uses a clustered topology to provide high availability. Each server and database is transparently replicated to ensure that a server is always accessible, even in the event of a database or server failure.
Inside the database cluster, traffic is forwarded to the appropriate Azure SQL database.
Connectivity from within Azure
If you're connecting from within another Azure service, such as a web application running under Azure App Service, your connections have a connection policy of Redirect by default. A policy of Redirect means that after your application establishes a connection to the Azure SQL database through the gateway, all following requests from your application will go directly to the database rather than through the gateway. If connectivity to the database subsequently fails, your application will have to reconnect through the gateway, when it might be directed to a different copy of the database running on another server in the cluster.

Connectivity from outside of Azure
If you're connecting from outside Azure, such as an on-premises application, your connections have a connection policy of Proxy by default. A policy of Proxy means the connection is established via the gateway, and all subsequent requests flow through the gateway. Each request could (potentially) be serviced by a different database in the cluster.

Configure DoSGuard
Denial of service (DoS) attacks are reduced by a SQL Database gateway service called DoSGuard. DoSGuard actively tracks failed logins from IP addresses. If there are multiple failed logins from a specific IP address within a period of time, the IP address is blocked from accessing any resources in the service for a short while.
In addition, the Azure SQL Database gateway performs the following tasks:
- It validates all connections to the database servers, to ensure that they are from genuine clients.
- It encrypts all communications between a client and the database servers.
- It inspects each network packet sent over a client connection. The gateway validates the connection information in the packet, and forwards it to the appropriate physical server based on the database name that's specified in the connection string.
Configure Azure Database for PostgreSQL
When you create your Azure Database for PostgreSQL server, a default database named postgres is created. To connect to your database server, you need your full server name and admin sign-in credentials. You can easily find the server name and sign in information on the server Overview page in the portal. This page contains the Server name and the Server admin sign-in name.

Note
Connections to your Azure Database for PostgreSQL server communicate over port 5432. When you try to connect from within a corporate network, outbound traffic over port 5432 might not be allowed by your network's firewall. If so, you can't connect to your server unless your IT department opens port 5432.
Configure server parameters and extensions
A PostgreSQL database server has a number of configuration parameters that you can set. These parameters support fine-tuning of the database, and debugging of code in the database. You can modify these parameters using the Server parameters page in the Azure portal.

If you're familiar with PostgreSQL, you'll find that not all parameters are supported in Azure. The Server parameters page on the Microsoft website describes the PostgreSQL parameters that are available.
PostgreSQL also provides the ability to extend the functionality of your database using extensions. Extensions bundle multiple related SQL objects together in a single package that can be loaded or removed from your database with a single command. After being loaded in the database, extensions function like built-in features. You install an extension in your database before you can use it. To install a particular extension, run the CREATE EXTENSION command from psql tool to load the packaged objects into your database. Not all PostgreSQL extensions are supported in Azure. For a full list, read PostgreSQL extensions in Azure Database for PostgreSQL - Single Server.
Configure read replicas
You can replicate data from an Azure Database for PostgreSQL server to a read-only server. Azure Database for PostgreSQL supports replication from the master server to up to five replicas. Replicas are updated asynchronously with the PostgreSQL engine native replication technology.
Read replicas help to improve the performance and scale of read-intensive workloads. Read workloads can be isolated to the replicas, while write workloads can be directed to the master.
A common scenario is to have BI and analytical workloads use read replicas as the data source for reporting.
Because replicas are read-only, they don't directly reduce the burden of write operations on the master. This feature isn't targeted at write-intensive workloads.
Replicas are new servers that you manage similar to regular Azure Database for PostgreSQL servers. For each read replica, you're billed for the provisioned compute in vCores and storage in GB/month.
Use the Replication page for a PostgreSQL server in the Azure portal to add read replicas to your database:

Configure Azure Database for MySQL
In order to connect to the MySQL database you've provisioned, you'll need to enter the connection information. This information includes fully qualified server name and sign-in credentials. You can find this information on the Overview page for your server:

Note
Connections to your Azure Database for MySQL server communicate over port 3306. When you try to connect from within a corporate network, outbound traffic over port 3306 might not be allowed by your network's firewall. If so, you can't connect to your server unless your IT department opens port 3306.
Important
By default, SSL connection security is required and enforced on your Azure Database for MySQL server.
Configure server parameters
Like PostgreSQL, a MySQL database server has a number of configuration parameters that you can set. You can modify these parameters using the Server parameters page in the Azure portal.

You can find more information about the parameters available for MySQL in Azure on the How to configure server parameters in Azure Database for MySQL by using the Azure portal page on the Microsoft website.
Configure read replicas
This feature is similar to that available for PostgreSQL. You can create up to five read replicas for a MySQL database. This feature enables you to geo-replicate data across regions and distribute the overhead associated with read-intensive workloads. Replication is asynchronous from the master server, so there may be some lag between records being written at the master and becoming available across all replicas.
Read replication isn't intended to support write-heavy workloads.
Use the Replication page for a MySQL server in the Azure portal to add read replicas to your database.
Exercise: Provision Azure relational database services
Email is required to activate a sandbox or lab
Your Microsoft account must be linked to a valid email to activate a sandbox or lab. Go to Microsoft Account Settings to link your email and try again.
For more information, please check the troubleshooting guidance page.
As part of your role at Contoso as a data engineer, you've been asked to create and configure SQL Server, PostgreSQL, and MySQL servers for Azure.
The free sandbox allows you to create resources in a subset of the Azure global regions. Select a region from the following list when you create resources:
- West US 2
- South Central US
- Central US
- East US
- West Europe
- Southeast Asia
- Japan East
- Brazil South
- Australia Southeast
- Central India
Create your Azure SQL Database service
In this exercise you'll set up your Azure SQL Database instance, which includes creating your server.
Over time if you realize you need additional compute power to keep up with demand, you can adjust performance options or even switch between the DTU and vCore performance models.
Sign into the Azure portal using the same account you activated the sandbox with.
In the portal, select Create a resource from the upper left-hand corner. Select Databases, then select SQL Database.

Enter the following values into the form:
Under Server, select Create new, fill out the form with the following values, and then select OK:
Under Compute + storage, select Configure database.
On the General Purpose tab, leave vCores set to 2, change Data max size to 50 GB, and then select Apply
Back on the Create SQL Database page, select Additional settings.
Use these values to fill out the form.
Back on the Create SQL Database page, select Security and set Enable Azure Defender for SQL to Not now. | Advanced Data Security | Not now |
Select Review + Create, and then select Create to create your Azure SQL database.
On the toolbar, select Notifications to monitor the deployment process.
When the process completes, select Pin to dashboard to pin your database server to the dashboard so that you have quick access when you need it later.

Query relational data in Azure
Introduction
Azure enables you to create relational databases using a number of technologies, including Azure SQL Database, Azure Database for PostgreSQL, Azure Database for MySQL, and Azure Database for MariaDB.
Imagine that you work as a developer for a large supermarket chain called Contoso. The company has created a data store that will be used to store product inventory. The development team has used an Azure SQL database to store their data. They need to know how to query and manipulate this data using SQL.
In this module, you'll learn how to use these database services to store and retrieve data. You'll examine how to use some of the common tools available for these database management systems to connect to database services running in Azure.
Note
This module focuses on using Azure SQL Database, Azure Database for PostgreSQL, and Azure Database for MySQL. If you are using Azure Database for MariaDB, the dialect of SQL is very similar to that used by MySQL.
Learning objectives
In this module, you will:
- Describe query techniques for data using the SQL language
- Query relational data
Introduction to SQL
SQL stands for Structured Query Language. SQL is used to communicate with a relational database. It's the standard language for relational database management systems. SQL statements are used to perform tasks such as update data in a database, or retrieve data from a database. Some common relational database management systems that use SQL include Microsoft SQL Server, MySQL, PostgreSQL, MariaDB, and Oracle.
Note
SQL was originally standardized by the American National Standards Institute (ANSI) in 1986, and by the International Organization for Standardization (ISO) in 1987. Since then, the standard has been extended several times as relational database vendors have added new features to their systems. Additionally, most database vendors include their own proprietary extensions that are not part of the standard, which has resulted in a variety of dialects of SQL.
In this unit, you'll learn about SQL. You'll see how it's used to query and maintain data in a database, and the different dialects that are available.
Understand SQL dialects
You can use SQL statements such as SELECT, INSERT, UPDATE, DELETE, CREATE, and DROP to accomplish almost everything that one needs to do with a database. Although these SQL statements are part of the SQL standard, many database management systems also have their own additional proprietary extensions to handle the specifics of that database management system. These extensions provide functionality not covered by the SQL standard, and include areas such as security management and programmability. Microsoft SQL Server, for example, uses Transact-SQL. This implementation includes proprietary extensions for writing stored procedures and triggers (application code that can be stored in the database), and managing user accounts. PostgreSQL and MySQL also have their own versions of these features.
Some popular dialects of SQL include:
Transact-SQL (T-SQL). This version of SQL is used by Microsoft SQL Server and Azure SQL Database.
pgSQL. This is the dialect, with extensions implemented in PostgreSQL.
PL/SQL. This is the dialect used by Oracle. PL/SQL stands for Procedural Language/SQL.
Users who plan to work specifically with a single database system should learn the intricacies of their preferred SQL dialect and platform.
Understand SQL statement types
SQL statements are grouped into two main logical groups, and they are:
- Data Manipulation Language (DML)
- Data Definition Language (DDL)
Use DML statements
You use DML statements to manipulate the rows in a relational table. These statements enable you to retrieve (query) data, insert new rows, or edit existing rows. You can also delete rows if you don't need them anymore.
The four main DML statements are:
The basic form of an INSERT statement will insert one row at a time. By default, the SELECT, UPDATE, and DELETE statements are applied to every row in a table. You usually apply a WHERE clause with these statements to specify criteria; only rows that match these criteria will be selected, updated, or deleted.
Warning
SQL doesn't provide are you sure? prompts, so be careful when using DELETE or UPDATE without a WHERE clause because you can lose or modify a lot of data.
The following code is an example of a SQL statement that selects all rows that match a single filter from a table. The FROM clause specifies the table to use:
SELECT *
FROM MyTable
WHERE MyColumn2 = 'contoso'
If a query returns many rows, they don't necessarily appear in any specific sequence. If you want to sort the data, you can add an ORDER BY clause. The data will be sorted by the specified column:
SELECT *
FROM MyTable
ORDER BY MyColumn1
You can also run SELECT statements that retrieve data from multiple tables using a JOIN clause. Joins indicate how the rows in one table are connected with rows in the other to determine what data to return. A join condition defines the way two tables are related in a query by:
- Specifying the column from each table to be used for the join. A typical join condition specifies a foreign key from one table and its associated primary key in the other table.
- Specifying a logical operator (for example, = or <>,) to be used in comparing values from the columns.
The following query shows an example that joins two tables, named Inventory and CustomerOrder. It retrieves all rows where the value in the ID column in the Inventory table matches the value in the InventoryID column in the CustomerOrder table.
SELECT *
FROM Inventory
JOIN CustomerOrder
ON Inventory.ID = CustomerOrder.InventoryID
SQL provides aggregate functions. An aggregate function calculates a single result across a set of rows or an entire table. The example below finds the minimum value in the MyColumn1 column across all rows in the MyTable table:
SELECT MIN(MyColumn1)
FROM MyTable
A number of other aggregate functions are available, including MAX (which returns the largest value in a column), AVG (which returns the average value, but only if the column contains numeric data), and SUM (which returns the sum of all the values in the column, but only if the column is numeric).
The next example shows how to update an existing row using SQL. It modifies the value of the second column but only for rows that have the value 3 in MyColumn1. All other rows are left unchanged:
UPDATE MyTable
SET MyColumn2 = 'contoso'
WHERE MyColumn1 = 3
Warning
If you omit the WHERE clause, an UPDATE statement will modify every row in the table.
Use the DELETE statement to remove rows. You specify the table to delete from, and a WHERE clause that identifies the rows to be deleted:
DELETE FROM MyTable
WHERE MyColumn2 = 'contoso'
Warning
If you omit the WHERE clause, a DELETE statement will remove every row from the table.
The INSERT statement takes a slightly different form. You specify a table and columns in an INTO clause, and a list of values to be stored in these columns. Standard SQL only supports inserting one row at a time, as shown in the following example. Some dialects allow you to specify multiple VALUES clauses to add several rows at a time:
INSERT INTO MyTable(MyColumn1, MyColumn2, MyColumn3)
VALUES (99, 'contoso', 'hello')
Use DDL statements
You use DDL statements to create, modify, and remove tables and other objects in a database (table, stored procedures, views, and so on).
The most common DDL statements are:
Warning
The DROP statement is very powerful. When you drop a table, all the rows in that table are lost. Unless you have a backup, you won't be able to retrieve this data.
The following example creates a new database table. The items between the parentheses specify the details of each column, including the name, the data type, whether the column must always contain a value (NOT NULL), and whether the data in the column is used to uniquely identify a row (PRIMARY KEY). Each table should have a primary key, although SQL doesn't enforce this rule.
Note
Columns marked as NOT NULL are referred to as mandatory columns. If you omit the NOT NULL clause, you can create rows that don't contain a value in the column. An empty column in a row is said to have a NULL value.
CREATE TABLE MyTable
(
    MyColumn1 INT NOT NULL PRIMARY KEY,
    MyColumn2 VARCHAR(50) NOT NULL,
    MyColumn3 VARCHAR(10) NULL
);
The datatypes available for columns in a table will vary between database management systems. However, most database management systems support numeric types such as INT (an integer, or whole number), and string types such as VARCHAR (VARCHAR stands for variable length character data). For more information, see the documentation for your selected database management system.
Query relational data in Azure SQL Database
You run SQL commands from tools and utilities that connect to the appropriate database. The tooling available depends on the database management system you're using. In this unit, you'll learn about the tools you can use to connect to Azure SQL Database.
Retrieve connection information for Azure SQL Database
You can use any of these tools to query data held in Azure SQL Database:
- The query editor in the Azure portal
- The
sqlcmdutility from the command line or the Azure Cloud Shell - SQL Server Management Studio
- Azure Data Studio
- SQL Server Data Tools
To use these tools, you first need to establish a connection to the database. You'll require the details of the server to connect to, an Azure SQL Database account (a username and password) that has access to this server, and the name of the database to use on this server. You can find the server name for a database using the Azure portal: go to the page for your database, and on the Overview page note the fully qualified server name in the Server name field.
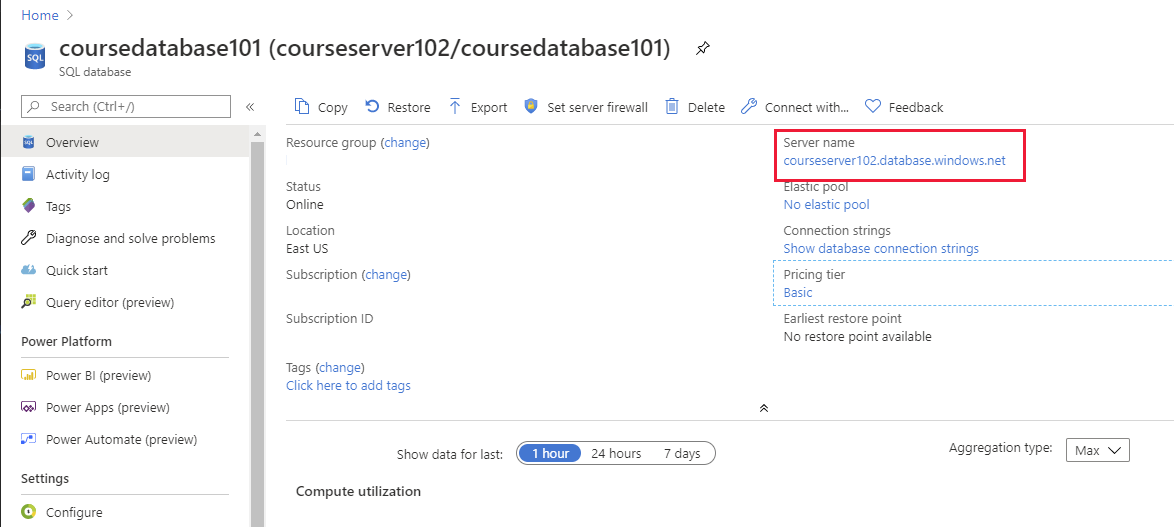
Some tools and applications require a connection string that identifies the server, database, account name, and password. You can find this information from the Overview page for a database in the Azure portal: select Show database connection strings.
Note
The database connection string shown in the Azure portal does not include the password for the account. You must contact your database administrator for this information.
Use the Azure portal to query a database
To access the query editor in the Azure portal, go to the page for your database and select Query editor. You'll be prompted for credentials. You can set the Authorization type to SQL Server authentication and enter the user name and password that you set up when you created the database. Or you can select Active Directory password authentication and provide the credentials of an authorized user in Azure Active Directory. If Active Directory single sign-on is enabled, you can connect by using your Azure identity.

You enter your SQL query in the query pane and then click Run to execute it. Any rows that are returned appear in the Results pane. The Messages pane displays information such as the number of rows returned, or any errors that occurred:
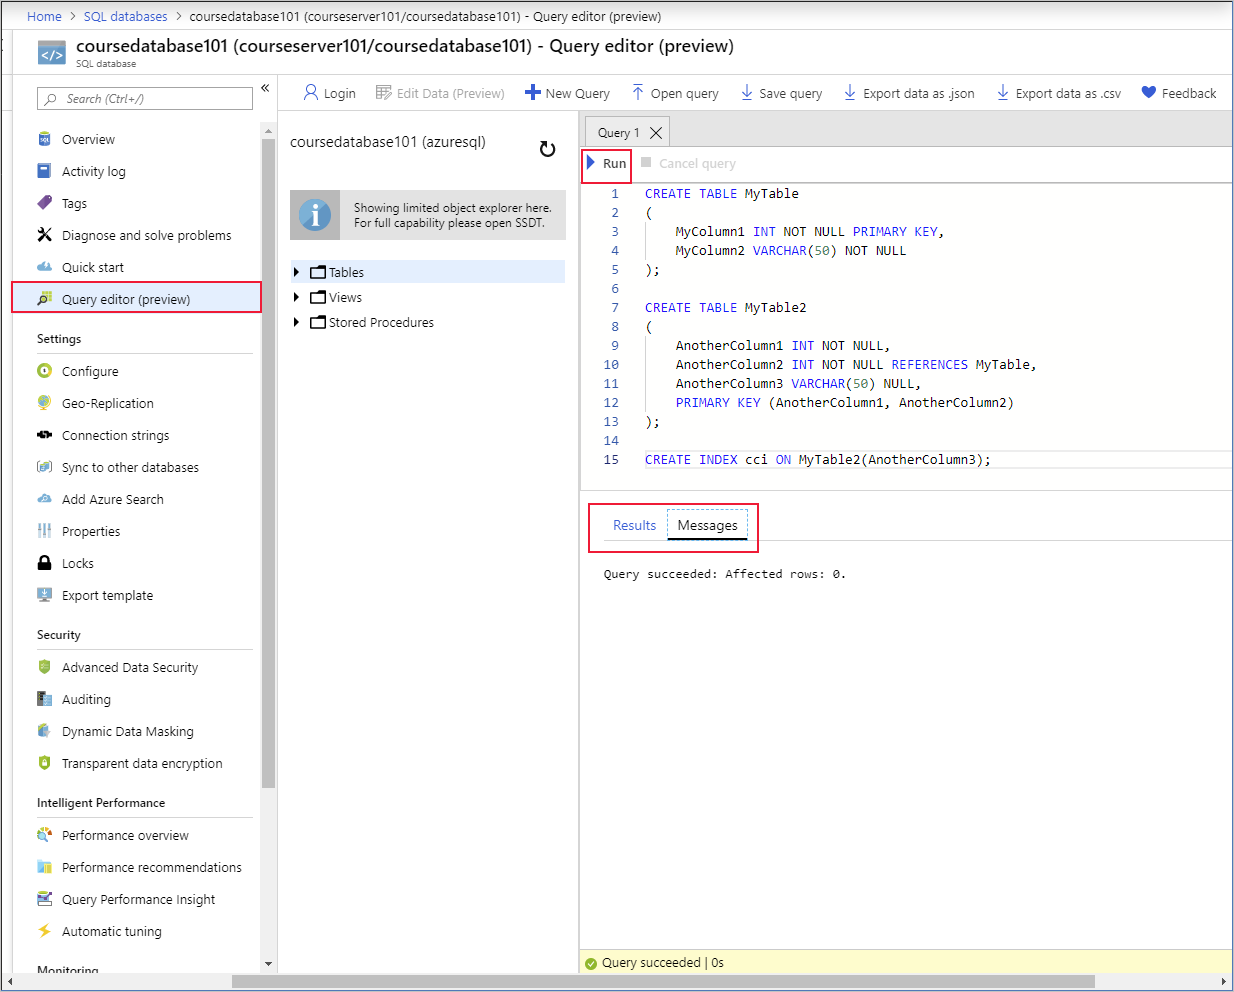
You can also enter INSERT, UPDATE, DELETE, CREATE, and DROP statements in the query pane.
Use SQLCMD to query a database
The sqlcmd utility runs from the command line and is also available in the Cloud Shell. You specify parameters that identify the server, database, and your credentials. The code below shows an example. Replace <server> with the name of the database server that you created, <database> with the name of your database, and <user name> and <password> with your credentials.
Note
To use the sqlcmd utility from the command line, you must install the Microsoft command line utilities on your computer. You can find download instructions, and more details on running the sqlcmd utility on the sqlcmd Utility web page.
sqlcmd -S <server>.database.windows.net -d <database> -U <username> -P <password>
If the sign-in command succeeds, you'll see a 1> prompt. You can enter SQL commands, then type GO on a line by itself to run them.
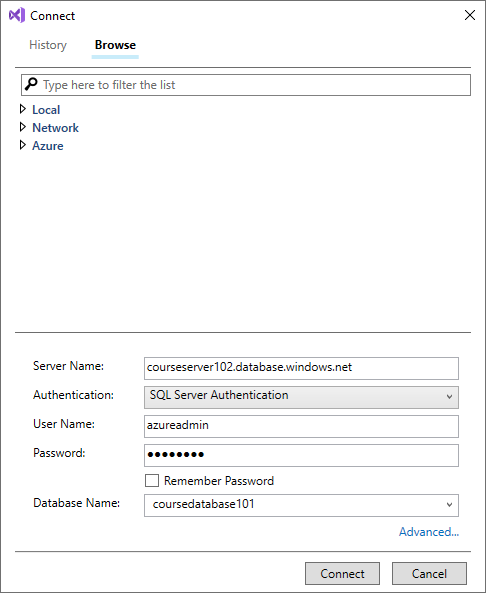
Use Azure Data Studio
Azure Data Studio is a graphical utility for creating and running SQL queries from your desktop. For download and installation instructions, visit the Download and install Azure Data Studio page on the Microsoft website.
The first time you run Azure Data Studio the Welcome page should open. If you don't see the Welcome page, select Help, and then select Welcome. Select Create a connection to open the Connection pane:
Fill in the following fields using the server name, user name, and password for your Azure SQL Server:
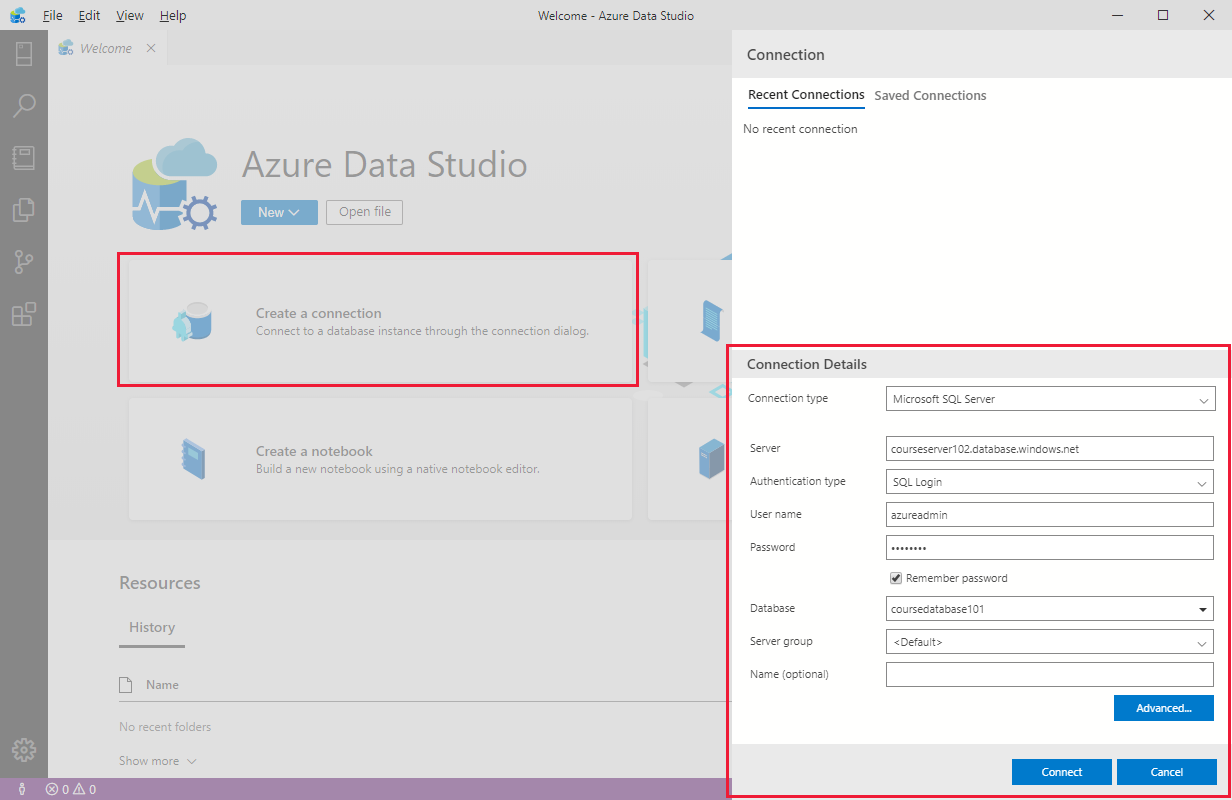
Select Connect.
If your server doesn't have a firewall rule allowing Azure Data Studio to connect, the Create new firewall rule form opens. Complete the form to create a new firewall rule. For details, see Create a server-level firewall rule using the Azure portal.
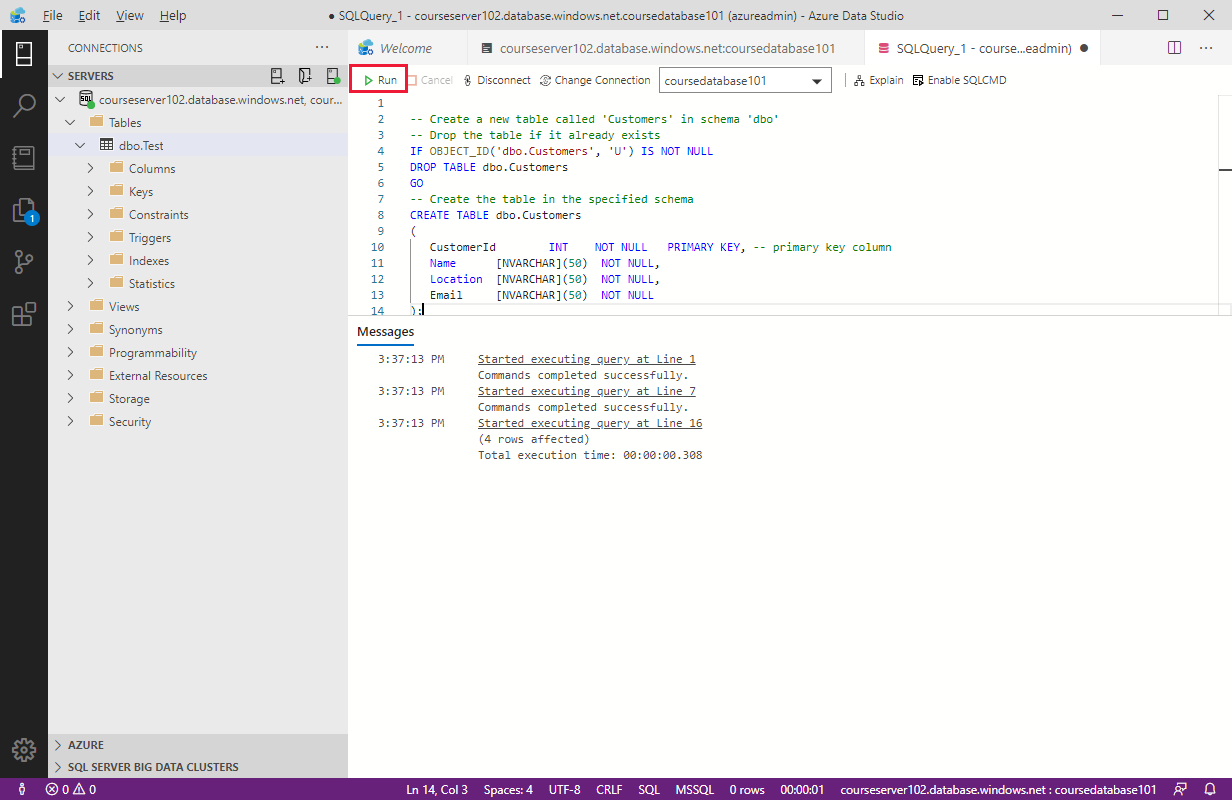
After successfully connecting, your server is available in the SERVERS sidebar on the Connections page. You can now use the New Query command to create and run scripts of SQL commands.

The example below uses Transact-SQL commands to create a new database (CREATE DATABASE and ALTER DATABASE commands are part of the Transact-SQL dialect, and aren't part of standard SQL). The script then creates a new table named Customers, and inserts four rows into this table. Again, the version of the INSERT statement, with four VALUES clauses, is part of the Transact-SQL dialect. The -- characters start a comment in Transact-SQL. The [ and ] characters surround identifiers, such as the name of a table, database, column, or data type. The N character in front of a string indicates that the string uses the Unicode character set.
Note
You can't create new SQL databases from a connection in Azure Data Studio if you're running SQL Database single database or elastic pools. You can only create new databases in this way if you're using SQL Database managed instance.
IF NOT EXISTS (
   SELECT name
   FROM sys.databases
   WHERE name = N'TutorialDB'
)
CREATE DATABASE [TutorialDB];
GO

ALTER DATABASE [TutorialDB] SET QUERY_STORE=ON;
GO

-- Switch to the TutorialDB database
USE [TutorialDB]
GO

-- Create a new table called 'Customers' in schema 'dbo'
-- Drop the table if it already exists
IF OBJECT_ID('dbo.Customers', 'U') IS NOT NULL
DROP TABLE dbo.Customers;
GO

-- Create the table in the specified schema
CREATE TABLE dbo.Customers
(
   CustomerId        INT    NOT NULL   PRIMARY KEY, -- primary key column
   Name      [NVARCHAR](50)  NOT NULL,
   Location  [NVARCHAR](50)  NOT NULL,
   Email     [NVARCHAR](50)  NOT NULL
);
GO

-- Insert rows into table 'Customers'
INSERT INTO dbo.Customers
   ([CustomerId],[Name],[Location],[Email])
VALUES
   ( 1, N'Orlando', N'Australia', N''),
   ( 2, N'Keith', N'India', N'keith0@adventure-works.com'),
   ( 3, N'Donna', N'Germany', N'donna0@adventure-works.com'),
   ( 4, N'Janet', N'United States', N'janet1@adventure-works.com');
GO
To execute the script, select Run on the toolbar. Notifications appear in the MESSAGES pane showing query progress.
Use SQL Server Management Studio
SQL Server Management Studio is another tool that you can download and run on your desktop. See Download SQL Server Management Studio (SSMS) for details.
To connect to a server and database, perform the following steps:
Open SQL Server Management Studio.
When the Connect to Server dialog box appears, enter the following information:

Select Connect. The Object Explorer window opens.
To view the database's objects, expand Databases and then expand your database node.
On the toolbar, select New Query to open a query window.
Enter your SQL statements, and then select Execute to run queries and retrieve data from the database tables.

Use SQL Server Data Tools in Visual Studio
Visual Studio is a popular development tool for building applications. It's available in several editions. You can download the free community edition from the Visual Studio Downloads page on the Microsoft website.
SQL Server Data Tools are available from the Tools menu in Visual Studio. To connect to an existing Azure SQL Database instance:
In Visual Studio, on the Tools menu, select SQL Server, and then select New Query.
In the Connect dialog box, enter the following information, and then select Connect:
In the Query window, enter your SQL query, and then select the Execute button in the toolbar. The results appear in the Results pane.

Query relational data in Azure Database for PostgreSQL
PostgreSQL provides many tools you can use to connect to a PostgreSQL database and run queries. These tools include the pgAdmin graphical user interface, and the psql command-line utility. There are a large number of third-party utilities you can use as well.
In this unit, you'll see how to connect to a PostgreSQL database running in Azure Database for PostgreSQL from the command line using psql, and from Azure Data Studio.
Retrieve connection information for Azure Database for PostgreSQL
To connect to a PostgreSQL database, you require the name of the server, and the credentials for an account that has access rights to connect to the server. You can find the server name and the name of the default administrator account on the Overview page for the Azure Database for PostgreSQL instance in the Azure portal. Contact your administrator for the password.

As with Azure SQL Database, you must open the PostgreSQL firewall to enable client applications to connect to the service. For detailed information, see Firewall rules in Azure Database for PostgreSQL - Single Server
Use psql to query a database
The psql utility is available in the Azure Cloud Shell. You can also run it from a command prompt on your desktop computer, but you must download and install the psql client. You can find the psql client on the postgresql.org website.
To connect to Azure Database for PostgreSQL using psql, perform the following operations:
Run the following command. Make sure to replace the server name and admin name with the values from the Azure portal.
Bashpsql --host=<server-name>.postgres.database.azure.com --username=<admin-user>@<server-name> --dbname=postgresEnter your password when prompted.
Note
postgres is the default management database created with Azure Database for PostgreSQL. You can create additional databases using the CREATE DATABASE command from psql.
If your connection is successful, you'll see the prompt
postgres=>.You can create a new database with the following SQL command:
SQLCREATE DATABASE "Adventureworks";Note
You can enter commands across several lines. The semi-colon character acts as the command terminator.
Inside psql, you can run the command
\c Adventureworksto connect to the database.You can create tables and insert data using CREATE and INSERT commands, as shown in the following examples::
SQLCREATE TABLE PEOPLE(NAME TEXT NOT NULL, AGE INT NOT NULL); INSERT INTO PEOPLE(NAME, AGE) VALUES ('Bob', 35); INSERT INTO PEOPLE(NAME, AGE) VALUES ('Sarah', 28); CREATE TABLE LOCATIONS(CITY TEXT NOT NULL, STATE TEXT NOT NULL); INSERT INTO LOCATIONS(CITY, STATE) VALUES ('New York', 'NY'); INSERT INTO LOCATIONS(CITY, STATE) VALUES ('Flint', 'MI');You can retrieve the data you just added using the following SQL commands:
SQLSELECT * FROM PEOPLE; SELECT * FROM LOCATIONS;Other psql commands include:
\lto list databases.\dtto list the tables in the current database.
You can use the
\qcommand to quit psql.
Connect to PostgreSQL database using Azure Data Studio
To connect to Azure Database for PostgreSQL from Azure Data Studio, you must first install the PostgreSQL extension.
On the Extensions page, search for postgresql.

Select the PostgreSQL extension, and then select Install.
You can then use the extension to connect to PostgreSQL:
In Azure Data Studio, go to the SERVERS sidebar, and select New Connection.

In the Connection dialog box, in the Connection type drop-down list box, select PostgreSQL.
Fill in the remaining fields using the server name, user name, and password for your PostgreSQL server.

Select Connect to establish the connection. After successfully connecting, your server opens in the SERVERS sidebar. You can expand the Databases node to connect to databases on the server and view their contents. Use the New Query command in the toolbar to create and run queries.

The following example adds a new table to the database and inserts four rows.
SQL-- Create a new table called 'customers' CREATE TABLE customers( customer_id SERIAL PRIMARY KEY, name VARCHAR (50) NOT NULL, location VARCHAR (50) NOT NULL, email VARCHAR (50) NOT NULL ); -- Insert rows into table 'customers' INSERT INTO customers (customer_id, name, location, email) VALUES ( 1, 'Orlando', 'Australia', ''), ( 2, 'Keith', 'India', 'keith0@adventure-works.com'), ( 3, 'Donna', 'Germany', 'donna0@adventure-works.com'), ( 4, 'Janet', 'United States','janet1@adventure-works.com');From the toolbar, select Run to execute the query. As with Azure SQL, notifications appear in the MESSAGES pane to show query progress.
To query the data, enter a SELECT statement, and then click Run:
SQL-- Select rows from table 'customers' SELECT * FROM customers;The results of the query should appear in the results pane.
Query relational data in Azure Database for MySQL
As with PostgreSQL, there are many tools available to connect to MySQL that enable you to create and run scripts of SQL commands. You can use the mysql command-line utility, which is also available in the Azure Cloud Shell, or you can use graphical tools from the desktop such as MySQL Workbench.
In this unit, you'll see how to connect to Azure Database for MySQL using MySQL Workbench.
Note
Currently there are no extensions available for connecting to MySQL from Azure Data Studio.
Retrieve connection information for Azure Database for MySQL
Like SQL Database and PostgreSQL, you require the name of the server, and the credentials for an account that has access rights to connect to the server. You can find the server name and the name of the default administrator account on the Overview page for the Azure Database for MySQL instance in the Azure portal. Contact your administrator for the password.

You must also open the MySQL firewall to enable client applications to connect to the service. For detailed information, see Azure Database for MySQL server firewall rules.
Use MySQL Workbench to query a database
You can download and install MySQL Workbench from the MySQL Community Downloads page.
To connect to Azure MySQL Server by using MySQL Workbench, perform the following steps:
Start MySQL Workbench on your computer.
On the Welcome page, select Connect to Database.

In the Connect to Database dialog box, enter the following information on the Parameters tab:

Select OK to create the connection. If the connection is successful, the query editor will open.

You can use this editor to create and run scripts of SQL commands. The following example creates a database named quickstartdb, and then adds a table named inventory. It inserts some rows, then reads the rows. It changes the data with an update statement, and reads the rows again. Finally it deletes a row, and then reads the rows again.
SQL-- Create a database -- DROP DATABASE IF EXISTS quickstartdb; CREATE DATABASE quickstartdb; USE quickstartdb; -- Create a table and insert rows DROP TABLE IF EXISTS inventory; CREATE TABLE inventory (id serial PRIMARY KEY, name VARCHAR(50), quantity INTEGER); INSERT INTO inventory (name, quantity) VALUES ('banana', 150); INSERT INTO inventory (name, quantity) VALUES ('orange', 154); INSERT INTO inventory (name, quantity) VALUES ('apple', 100); -- Read SELECT * FROM inventory; -- Update UPDATE inventory SET quantity = 200 WHERE id = 1; SELECT * FROM inventory; -- Delete DELETE FROM inventory WHERE id = 2; SELECT * FROM inventory;To run the sample SQL Code, select the lightning bolt icon in the toolbar

The query results appear in the Result Grid section in the middle of the page. The Output list at the bottom of the page shows the status of each command as it is run.
Exercise: Use SQL to query Azure SQL Database
Email is required to activate a sandbox or lab
Your Microsoft account must be linked to a valid email to activate a sandbox or lab. Go to Microsoft Account Settings to link your email and try again.
For more information, please check the troubleshooting guidance page.
Contoso has provisioned the SQL database and has imported all the inventory data into the data store. As lead developer, you've been asked to run some queries over the data.
In this exercise, you'll query the database to find how many products are in the database, and the number of items in stock for a particular product.
Setup
To save time, the database is provisioned and populated running a script. You'll download the script from a GitHub repository. The script performs the following operations:
- Creates an Azure SQL Database server.
- Creates an Azure SQL database attached to the server.
- Opens the firewall to allow SQL traffic from the internet.
- Connects to the database and run a SQL script to create a table and insert data.
Run the following git clone command in the Cloud Shell to clone the repository that contains the data and setup script in GitHub. The repository is copied to a local folder named dp-900/sql.
Bashgit clone https://github.com/MicrosoftLearning/DP-900T00A-Azure-Data-Fundamentals dp-900Run the following command to move to the dp-900/sql folder.
Bashcd dp-900/sqlRun the setup.sh to create the Azure SQL database and server, as follows:
Bashbash setup.sh
The script takes a few minutes to run. When the script finishes, it will display the connection details for the database. Write down the username and password.
Connect to the query editor
You'll use the built-in Query editor in the Azure portal to connect to the database and query the data.
Sign into the Azure portal using the same account you activated the sandbox with.
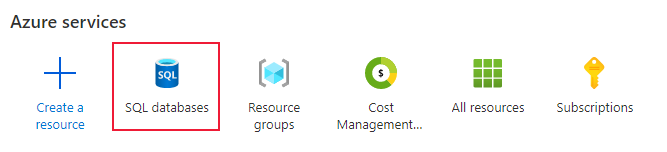
In the portal, on the home page select SQL databases, and then select Inventory database located on the server you have just created.
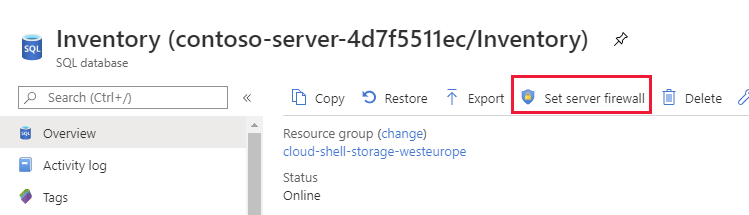
On the Overview page for your database, select Set server firewall.
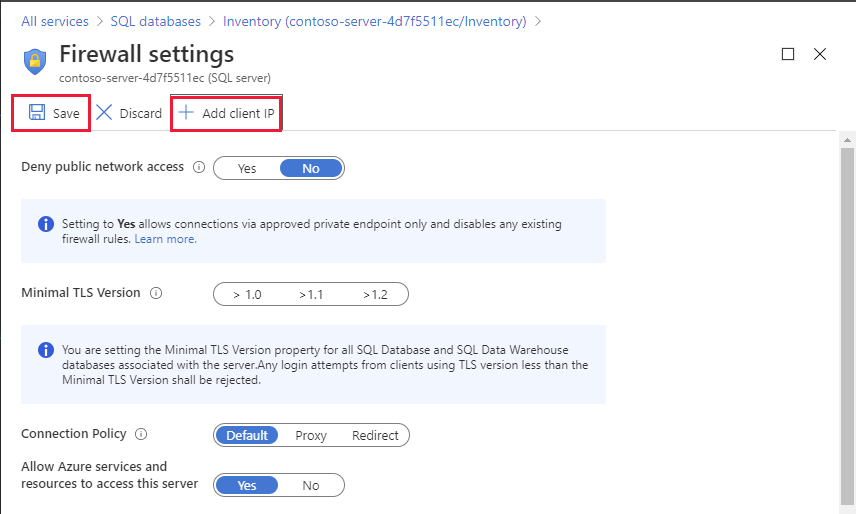
On the Firewall settings page, select Add client IP, and then select Save.
Close the Firewall settings page, and return to the Overview page for your database.
On the Overview page, select Query editor (preview) in the left menu.
Enter the username and password you recorded earlier when the setup script ran, and then select OK.
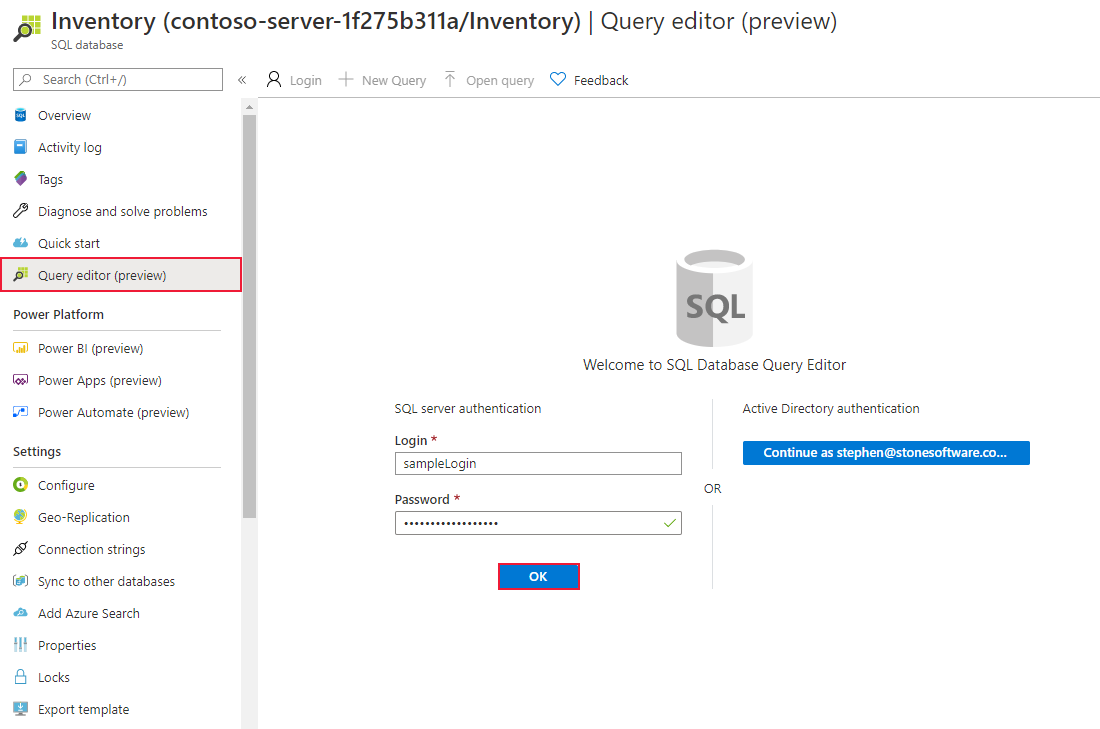
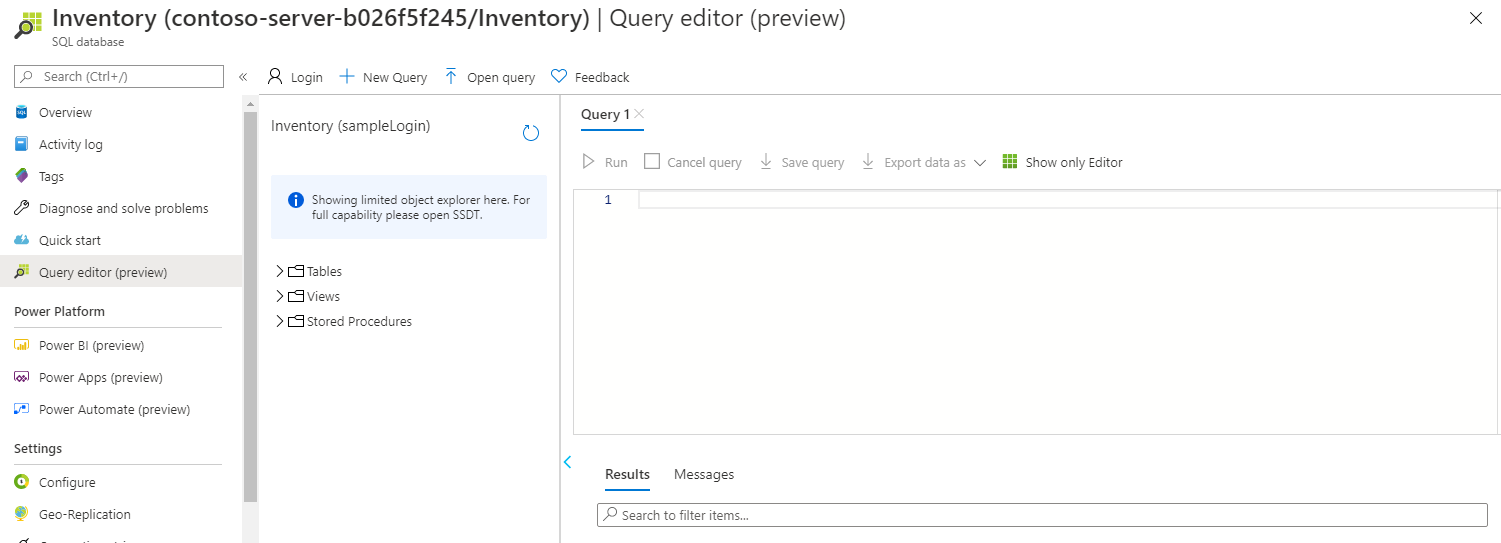
You'll be presented with a screen similar to this example:
Tip
Adding your client IP in this step will not account for any existing VPN connections. If you can't complete step 7, disable any VPN connections or add the additional IP address manually from any errors displayed.
Run queries against the database
Copy the following SQL statement into the editor. Select Run, to check everything is working. You should see a list of four inventory items
SQLSELECT * FROM Inventory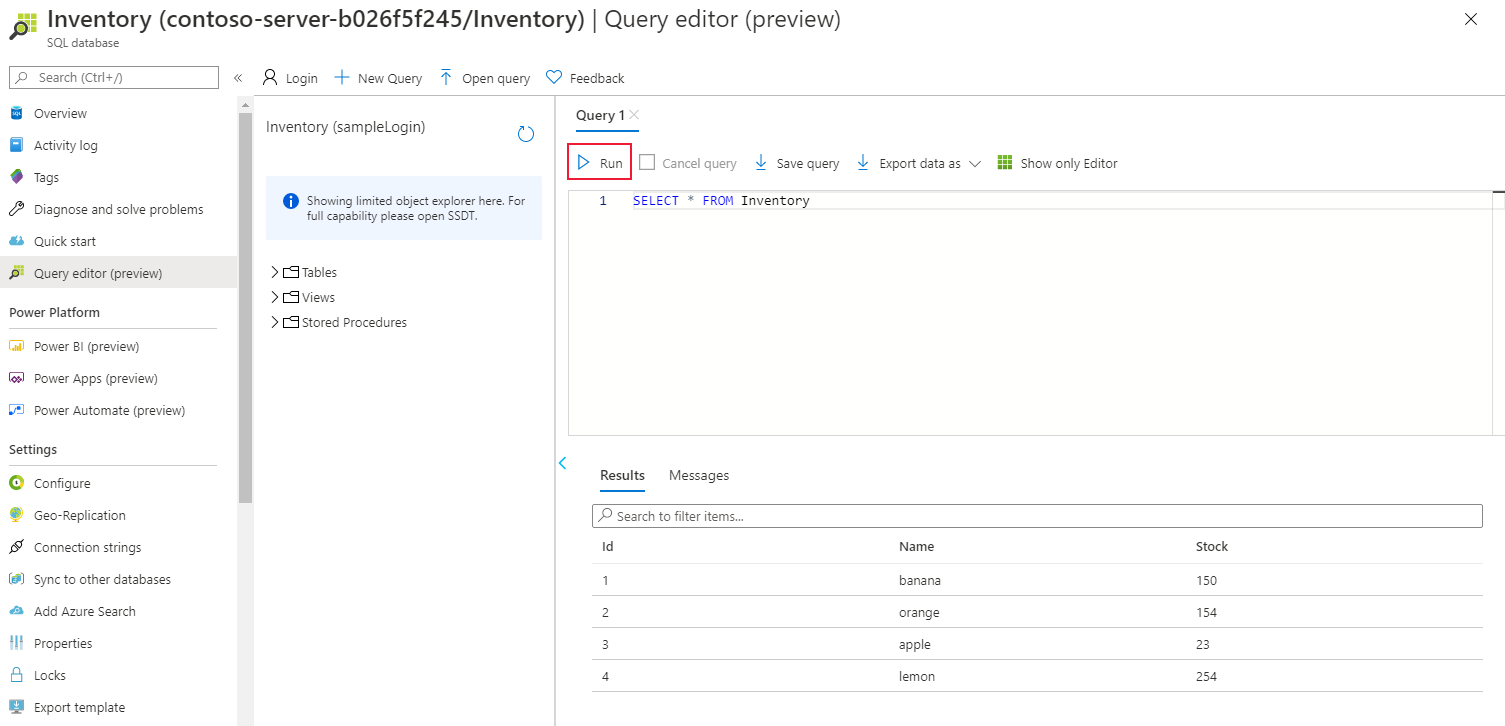
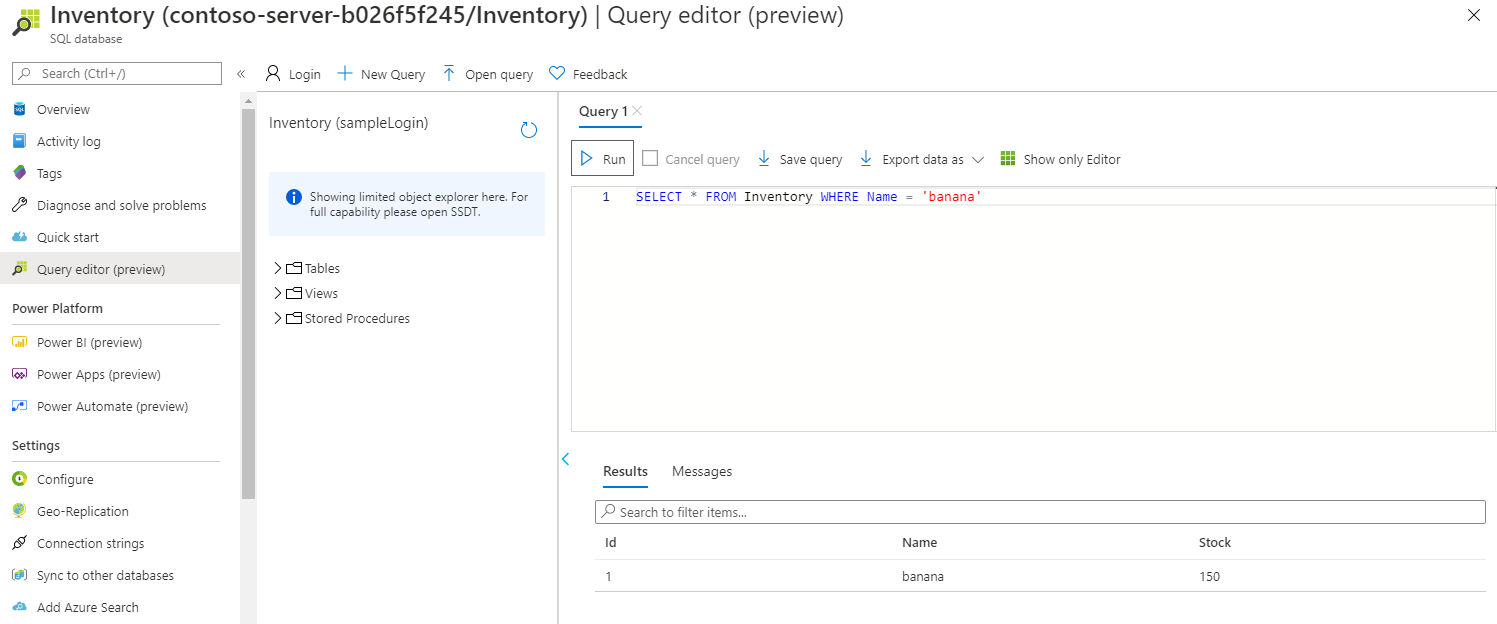
Replace the current SQL statement with the following statement to only show the number of bananas in stock:
SQLSELECT * FROM Inventory WHERE Name = 'banana'There should be 150 bananas.
Replace the SQL statement with the following statement to retrieve the inventory items in order of the quantity in stock:
SQLSELECT * FROM Inventory ORDER BY Stock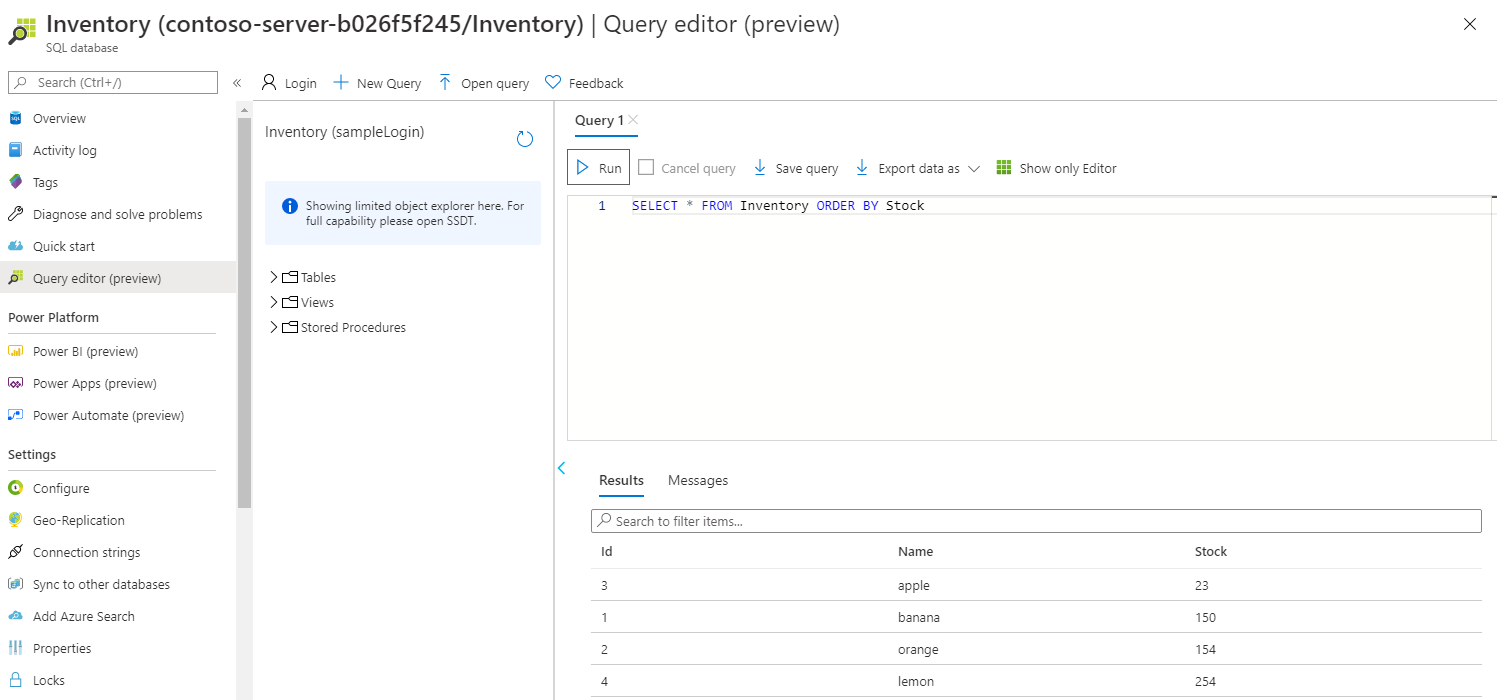
Replace the SQL statement with the statement shown below. This statement is a query that uses the JOIN operator to combine data from the CustomerOrder table and the Inventory table. It lists the details of orders placed by customers together with the inventory information for each item ordered:
SQLSELECT * FROM Inventory JOIN CustomerOrder ON Inventory.Id = CustomerOrder.InventoryId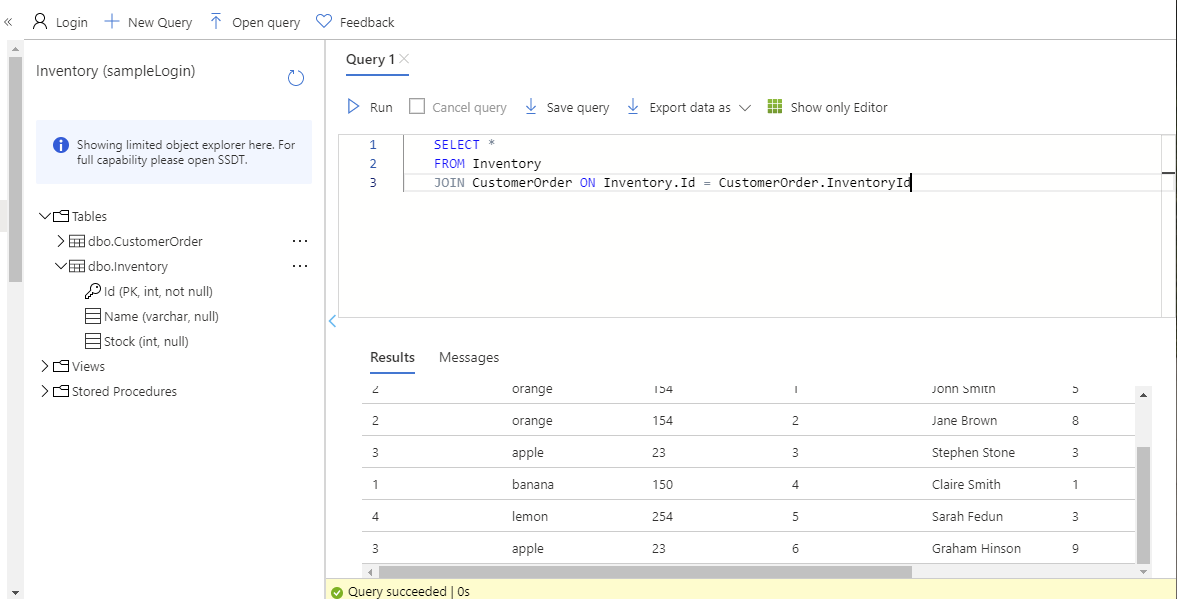
Change the query to find the names of all customers who have ordered oranges.
SQLSELECT CustomerOrder.CustomerName FROM CustomerOrder JOIN Inventory ON CustomerOrder.InventoryId = Inventory.ID AND Inventory.Name = 'orange'This query should return two customers: John Smith and Jane Brown
Find out how many customers have ordered lemons. This query uses the COUNT(*) function, which returns the number of rows that match the query criteria.
SQLSELECT COUNT(*) FROM CustomerOrder JOIN Inventory ON CustomerOrder.InventoryId = Inventory.ID AND Inventory.Name = 'lemon'The results of this query should indicate that only one customer has ordered lemons.
Which fruits has John Smith ordered?
SQLSELECT Inventory.Name FROM CustomerOrder JOIN Inventory ON CustomerOrder.InventoryId = Inventory.ID AND CustomerOrder.CustomerName = 'John Smith'The results of this query should show that John Smith has only ordered oranges.
What is the total quantity of items ordered by all customers? The Quantity column in the CustomerOrder table contains the quantity for each order. This query uses the SUM aggregate function to add the quantities together to product a grand total:
SQLSELECT SUM(CustomerOrder.Quantity) FROM CustomerOrderThe answer should be 29.
You've now seen how to run SQL queries against a SQL database. If you have time, try to add some more rows into both tables using INSERT statements, modify the rows using UPDATE statements, and remove rows using DELETE statements.

Comments
Post a Comment