DAY 8 -AZURE DP900(Create an Azure Storage account)
Decide how many storage accounts you need
Organizations often have multiple storage accounts to enable them to implement different sets of requirements. In the chocolate-manufacturer example, there will be one storage account for private business data and one storage account for consumer-facing files. In this exercise, you'll learn the policy factors that are controlled by each type of storage account, which will help you decide how many accounts you need.
What is Azure Storage?
Azure provides many ways to store your data, including multiple database options like Azure SQL Database, Azure Cosmos DB, and Azure Table Storage. Azure offers multiple ways to store and send messages, such as Azure Queues and Event Hubs. You can even store loose files using services like Azure Files and Azure Blobs.
Azure groups four of these data services together under the name Azure Storage. The four services are Azure Blobs, Azure Files, Azure Queues, and Azure Tables. The following illustration shows the elements of Azure Storage.
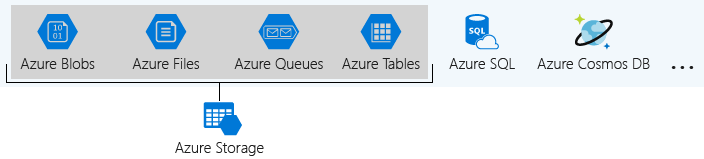
These four data services are all primitive, cloud-based storage services, and are often used together in the same application.
What is a storage account?
A storage account is a container that groups a set of Azure Storage services together. Only data services from Azure Storage can be included in a storage account (Azure Blobs, Azure Files, Azure Queues, and Azure Tables). The following illustration shows a storage account containing several data services.

Combining data services into a single storage account enables you to manage them as a group. The settings you specify when you create the account, or any changes that you make after creation, apply to all services in the storage account. Deleting a storage account deletes all of the data stored inside it.
A storage account is an Azure resource and is part of a resource group. The following illustration shows an Azure subscription containing multiple resource groups, where each group contains one or more storage accounts.

Other Azure data services, such as Azure SQL and Azure Cosmos DB, are managed as independent Azure resources and cannot be included in a storage account. The following illustration shows a typical arrangement: Blobs, Files, Queues, and Tables are contained within storage accounts, while other services are not.

Storage account settings
A storage account defines a policy that applies to all the storage services in the account. For example, you could specify that all the contained services will be stored in the West US datacenter, accessible only over https, and billed to the sales department's subscription.
The settings that are defined by a storage account are:
Subscription: The Azure subscription that will be billed for the services in the account.
Location: The datacenter that will store the services in the account.
Performance: Determines the data services you can have in your storage account and the type of hardware disks used to store the data.
- Standard allows you to have any data service (Blob, File, Queue, Table) and uses magnetic disk drives.
- Premium provides more services for storing data. For example, storing unstructured object data as block blobs or append blobs, and specialized file storage used to store and create premium file shares. These storage accounts use solid-state drives (SSD) for storage.
Replication: Determines the strategy used to make copies of your data to protect against hardware failure or natural disaster. At a minimum, Azure automatically maintains three copies of your data within the datacenter associated with the storage account. The minimum replication is called locally redundant storage (LRS), and guards against hardware failure but does not protect you from an event that incapacitates the entire datacenter. You can upgrade to one of the other options such as geo-redundant storage (GRS) to get replication at different datacenters across the world.
Access tier: Controls how quickly you will be able to access the blobs in a storage account. Hot gives quicker access than Cool, but at increased cost. Hot access tier applies only to blobs, and serves as the default value for new blobs.
Secure transfer required: A security feature that determines the supported protocols for access. Enabled requires HTTPS, while disabled allows HTTP.
Virtual networks: A security feature that allows inbound access requests only from the virtual network(s) you specify.
How many storage accounts do you need?
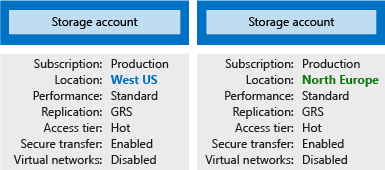
A storage account represents a collection of settings like location, replication strategy, and subscription owner. You need one storage account for each group of settings that you want to apply to your data. The following illustration shows two storage accounts that differ in one setting; that one difference is enough to require separate storage accounts.
The number of storage accounts you need is typically determined by your data diversity, cost sensitivity, and tolerance for management overhead.
Data diversity
Organizations often generate data that differs in where it is consumed, how sensitive it is, which group pays the bills, etc. Diversity along any of these vectors can lead to multiple storage accounts. Let's consider two examples:
Do you have data that is specific to a country or region? If so, you might want to store the data in a datacenter in that region or country for performance or compliance reasons. You will need one storage account for each geographical region.
Do you have some data that is proprietary and some for public consumption? If so, you could enable virtual networks for the proprietary data and not for the public data. Separating proprietary data and public data will also require separate storage accounts.
In general, increased diversity means an increased number of storage accounts.
Cost sensitivity
A storage account by itself has no financial cost; however, the settings you choose for the account do influence the cost of services in the account. Geo-redundant storage costs more than locally redundant storage. Premium performance and the Hot access tier increase the cost of blobs.
You can use multiple storage accounts to reduce costs. For example, you could partition your data into critical and non-critical categories. You could place your critical data into a storage account with geo-redundant storage and put your non-critical data in a different storage account with locally redundant storage.
Tolerance for management overhead
Each storage account requires some time and attention from an administrator to create and maintain. It also increases complexity for anyone who adds data to your cloud storage; everyone in an administrator role needs to understand the purpose of each storage account so they add new data to the correct account.
Storage accounts are powerful tools to help you obtain the performance and security you need while minimizing costs. A typical strategy is to start with an analysis of your data and create partitions that share characteristics like location, billing, and replication strategy, and then create one storage account for each partition.
Choose your account settings
The storage account settings we've already covered apply to the data services in the account. Here, we will discuss the three settings that apply to the account itself, rather than to the data stored in the account:
- Name
- Deployment model
- Account kind
These settings impact how you manage your account and the cost of the services within it.
Name
Each storage account has a name. The name must be globally unique within Azure, use only lowercase letters and digits and be between 3 and 24 characters.
Deployment model
A deployment model is the system Azure uses to organize your resources. The model defines the API that you use to create, configure, and manage those resources. Azure provides two deployment models:
- Resource Manager: the current model that uses the Azure Resource Manager API
- Classic: a legacy offering that uses the Azure Service Management API
Most Azure resources only work with Resource Manager, and makes it easy to decide which model to choose. However, storage accounts, virtual machines, and virtual networks support both, so you must choose one or the other when you create your storage account.
The key feature difference between the two models is their support for grouping. The Resource Manager model adds the concept of a resource group, which is not available in the classic model. A resource group lets you deploy and manage a collection of resources as a single unit.
Microsoft recommends that you use Resource Manager for all new resources.
Account kind
Storage account kind is a set of policies that determine which data services you can include in the account and the pricing of those services. There are three kinds of storage accounts:
- StorageV2 (general purpose v2): the current offering that supports all storage types and all of the latest features
- Storage (general purpose v1): a legacy kind that supports all storage types but may not support all features
- Blob storage: a legacy kind that allows only block blobs and append blobs
Microsoft recommends that you use the General-purpose v2 option for new storage accounts.
There are a few special cases that can be exceptions to this rule. For example, pricing for transactions is lower in general purpose v1, which would allow you to slightly reduce costs if that matches your typical workload.
The core advice here is to choose the Resource Manager deployment model and the StorageV2 (general purpose v2) account kind for all your storage accounts. The other options still exist primarily to allow existing resources to continue operation. For new resources, there are few reasons to consider the other choices.
Choose an account creation tool
There are several tools that create a storage account. Your choice is typically based on if you want a GUI and whether you need automation.
Available tools
The available tools are:
- Azure Portal
- Azure CLI (Command-line interface)
- Azure PowerShell
- Management client libraries
The portal provides a GUI with explanations for each setting. This makes the portal easy to use and helpful for learning about the options.
The other tools in the above list all support automation. The Azure CLI and Azure PowerShell let you write scripts, while the management libraries allow you to incorporate the creation into a client app.
How to choose a tool
Storage accounts are typically based on an analysis of your data, so they tend to be relatively stable. As a result, storage-account creation is usually a one-time operation done at the start of a project. For one-time activities, the portal is the most common choice.
In the rare cases where you need automation, the decision is between a programmatic API or a scripting solution. Scripts are typically faster to create and less work to maintain because there is no need for an IDE, NuGet packages, or build steps. If you have an existing client application, the management libraries might be an attractive choice; otherwise, scripts will likely be a better option.
Exercise - Create a storage account using the Azure portal
Email is required to activate a sandbox or lab
Your Microsoft account must be linked to a valid email to activate a sandbox or lab. Go to Microsoft Account Settings to link your email and try again.
For more information, please check the troubleshooting guidance page.
In this unit, you'll use the Azure portal to create a storage account for a fictitious southern California surf report web app. The surf report site lets users upload photos and videos of local beach conditions. Viewers will use the content to help them choose the beach with the best surfing conditions.
Your list of design and feature goals is:
- Video content must load quickly.
- The site must handle unexpected spikes in upload volume.
- Outdated content must be removed as surf conditions change so the site always shows current conditions.
You decide to buffer uploaded content in an Azure Queue for processing and then transfer it to an Azure Blob for persistent storage. You need a storage account that can hold both queues and blobs while delivering low-latency access to your content.
Create a storage account using Azure portal
Sign in to the Azure portal using the same account you used to activate the sandbox.
On the resource menu, or from the Home page, select Storage accounts. The Storage accounts pane appears.
On the command bar, select Create. The Create a storage account pane appears.
On the Basics tab, enter the following values for each setting.
Select Next : Advanced. On the Advanced tab, enter the following values for each setting.
Warning
If Enable large file shares is selected, it will enforce additional restrictions, and Azure files service connections without encryption will fail, including scenarios using SMB 2.1 or 3.0 on Linux. Because Azure storage doesn't support SSL for custom domain names, this option cannot be used with a custom domain name.
Select Next : Networking. On the Networking tab, enter the following values for each setting.
Select Next : Data protection. On the Data protection tab, enter the following values for each setting.
Select Next : Encryption. Accept the defaults.
Select Next : Tags. Here, you can associate key/value pairs with the account for your categorization to determine if a feature is available to selected Azure resources.
Select Review + create to validate your options and to ensure all the required fields are selected. If there are issues, this tab will identify them so you can correct them.
When validation passes successfully, select Create to deploy the storage account.
When deployment is complete, which may take up to two minutes, select Go to resource to view Essential details about your new storage account.
You created a storage account with settings driven by your business requirements. For example, you might have selected a West US datacenter because your customers were primarily located in southern California. The typical flow for creating a storage account is: first analyze your data and goals, and then configure the storage account options to match.
Summary
Storage accounts let you create a group of data management rules and apply them all at once to the data stored in the account: blobs, files, tables, and queues.
If you tried to achieve the same thing without storage accounts, the end product would be tedious and error-prone. For example, what are the chances that you could successfully apply the same rules to thousands of blobs?
Instead, you capture the rules in the settings for a storage account, and those rules are automatically applied to every data service in the account.
Clean up
The sandbox automatically cleans up your resources when you're finished with this module.
When you're working in your own subscription, it's a good idea at the end of a project to identify whether you still need the resources you created. Resources left running can cost you money. You can delete resources individually or delete the resource group to delete the entire set of resources.
Important
When you're working in your own subscription, to avoid unwanted usage charges, you must remove any resources that you create.
Use the following steps in the Azure portal to delete the resource group and all associated resources.
In the resource menu, select Resource groups.
Select the resource group you created.
In the command bar, select Delete resource group.
In the confirmation pane, you will be prompted to type the resource group name; you can right click and drag the title from the Resource group pane.
When the expected name is a match, Delete is available.
Select Delete. It may take several minutes to delete your resource group. Check Notifications in the Global Controls in the upper right corner of the Azure portal to ensure your operation completed.

Comments
Post a Comment